
mercredi 30 juin 2010
Japanese dress i
mardi 22 juin 2010
My darling skirt part two
Hello! Thank you again to all the awesome readers who come by this blog and to those who leave comments, even after months of doing this blogging thing I'm still amazed at the amount of good vibrations I get in exchange for showing you some of my modest garments! Let's start immediately with the third installment in the "Dior"^^ series, behold the Millefeuille Skirt!


I used a basic pencil skirt pattern from an old BWOF and I drafted my ruffles using the dimensions of the assembled skirt. I've made a Paint picture to show you the idea in case you'd want to get this "millefeuille" effect:
 I sewed lace along the ruffles because I thought it would add a little cuteness since the garment is black. Today I dressed it down for work with a greyish turtleneck and black pumps but I plan to wear it later with a white shirt, a pink satin belt with a bow^^ and leopard pumps. If I don't look like Bette Davis in Whatever Happened to Baby Jane? in said outfit I promise I'll take pics! See you!
lundi 21 juin 2010
My darling skirt part one
Hey there! I've finished a skirt to wear with the white shirt I made thinking -dreaming!- about Dior. It's design 125 from the April issue of BWOF, I used a cotton/linen blend that had been in my stash since last year and that was very pleasant to sew and I didn't line the skirt because I live in a hot country so the lighter the better :) It's not extremely fitted but I feel comfortable in it and this way if I put on a little weight during the holidays I'll still be able to wear it! I wish I could have taken the shoes in the photos, they were excellent, some leopard print platform and high-heeled sandals with a little beige bow the exact colour of the belt :(

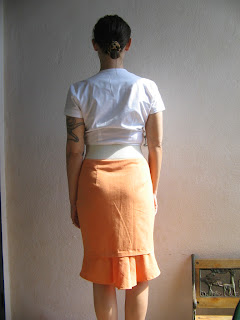


I can't wait to show you my next project, it's almost done and so far it's been going fantastically^^ See you soon friends!
samedi 19 juin 2010
My cute shirt
Hello friends! As you may know I'm fond of Japanese fashion, the super feminine and cute sort with tons of lace, pearls, bows, candy colors... Well I've fallen completely in love with the latest Dior collection that was shown in Shangai a few weeks ago:


 Amazing, right^^?! The last outfit especially has been haunting my dreams ever since I first saw it :) What's a seamstress to do then? Of course I couldn't recreate such a work of art -not to mention pulling off the entire outfit which would make me look like a giant pastry- but I can at least make a few pieces inspired by it! Proudly introducing the first in a series of slightly Dior related garments, my Simple Yet Cute White Shirt!

 I'm sure you recognize it! It's the vintage Advance pattern I've already used for a peach dress and a temari blouse. I've drafted a quick peplum to lengthen the top and that was it. I didn't put buttons but snaps because I plan to wear it tucked inside skirts or with fabric belts so I needed the front to be as flat as possible. I must admit that it's a tiny bit tight, hum I've been eating and drinking too much lately^^!

 As I wanted to have a really glamourous, girly piece I finished the yoke and sleeves' facings as well as the hem with lace. That's it for today, I have two skirts in making, I hope they turn out good and I can show you them soon! Have a lovely weekend, see you!


 Amazing, right^^?! The last outfit especially has been haunting my dreams ever since I first saw it :) What's a seamstress to do then? Of course I couldn't recreate such a work of art -not to mention pulling off the entire outfit which would make me look like a giant pastry- but I can at least make a few pieces inspired by it! Proudly introducing the first in a series of slightly Dior related garments, my Simple Yet Cute White Shirt!
 I'm sure you recognize it! It's the vintage Advance pattern I've already used for a peach dress and a temari blouse. I've drafted a quick peplum to lengthen the top and that was it. I didn't put buttons but snaps because I plan to wear it tucked inside skirts or with fabric belts so I needed the front to be as flat as possible. I must admit that it's a tiny bit tight, hum I've been eating and drinking too much lately^^!
 As I wanted to have a really glamourous, girly piece I finished the yoke and sleeves' facings as well as the hem with lace. That's it for today, I have two skirts in making, I hope they turn out good and I can show you them soon! Have a lovely weekend, see you!
lundi 14 juin 2010
Sew-along 7: the finished project!
Hi there, hope you had a nice weekend! As for me I had so much fun that I didn't have time to post pictures of the completed Nani Iro top^^. I slightly cinched the sides of the top but on the whole I don't find it that big. The sleeves however are huge! Maybe I shouldn't have lenghtened them, well I'll see how yours turned out if you didn't alter them. Alison has finished hers and I'm off to see it!

 I put a small black placket on the front so that I could add bows or tie ribbons.

 See you friends!

 I put a small black placket on the front so that I could add bows or tie ribbons.
 See you friends!
samedi 12 juin 2010
Sew-along 6
Hello everyone, hope you're doing well! Ali, thank you for your questions because they allow me to make a big post that I hope will be helpful for the making of the top. So let's see:
1 Front, cut 1 on fold
2 Back, cut 1 on fold
3 Sleeve, cut 2
Yes to these 3!
V-neck (cut two or four? I assume four because you mention facing): cut 4, there are indeed facings for the band.
Also on front and back, do I cut along the curvy outline for the v-neck (toward the neck) or the straight diagonal line used in tracing? Please cut along the curvy line BUT don't forget to add the 1 cm seam allowance before doing so!
And the 1 cm seam allowance for the v-band is toward the shoulder, is that where I stitch the v-band to the shirt (as in right sides together) or do I simply topstitch the band onto the shirt?
I would advise you to fold and topstitch as shown in the following pictures (which were BEAUTIFULLY enhanced with my great mastery of the sophisticated Paint software!):

 And don't forget to add a 1 cm seam-allowance along the other side of the band as well!
In sewing on the v-band, do you mean you do one strip at a time? Yes I do, first the left band along the bodice then the left facing to the attached left band. After that, I attached the right band to the bodice and finished with sewing the right facing to the attached right band -pheeew^^.
I'm trying to follow the numbered steps, but what does 1 say? And is the following right?
2. Stitch shoulder seams
3. V-band (stitch long sides together, fold, topstitch?): see the above paragraph on the attaching of the V-band
4. Sew sleeves: by the way, in case you haven't noticed it already there will be a little ease to spread while sewing the sleeves' cap.
5. Side seams
6, 7 & 8 seem obvious.
You're right! I think step 1 is just a reminder about tracing your pieces on fabric and cutting them before starting.
See you!
vendredi 11 juin 2010
Sewing update and sew-along 5
Hello friends! I haven't posted much lately but I've been sewing a lot and I've got a few things to show you :) First a skirt for my mama, it's a pattern from a recent BWOF:

She chose the fabric which is some blue Japanese double-gauze printed with flowers, swirls and even Mount Fuji! It was quick and gives a rather cool effect I think.
Next are two gifts for my best friend's birthday, a pink eyelet babydoll top and a yellow eyelet camisole (both were made using Japanese patterns of course).


Finally I made a top for me out of a small piece of beautiful flower fabric I found at the back of my usual shop, it's the same as the pink one for my friend minus the ruffle.

Regarding the Nani Iro top, I've started assembling pieces, I started with the shoulder seams so that I could attach the V-band: I've decided to sew one side of the V after the other ie first the outside and facing left side of the band and once this was done I attached the outside and facing right side of the band. Doesn't make much sense I'm afraid so I've prepared pictures to make it clearer.

 Phil you asked about the reason why it's better to have the V-band made in one continuous strip of fabric, I think it's purely for esthetical reasons because a shoulder seam would be quite bulky with the interfaced band and the facing inside. Moreover when you're finished attaching it to the bodice you'll see that the V slightly goes up at the neck and a seam here would definitely show, it's more harmonious in one piece :) Hope I answered your question, see you all and be safe!
lundi 7 juin 2010
Sew-along 4
Hello! Today I've started tracing on the fabrics but I managed to sort of burn the white -of course!- back piece when ironing it :( it ended brown so I had to wash it and now I must wait for it to dry before continuing.
The "1"s you see everywhere on the pattern stand for the 1 cm seam allowances you're supposed to add. I use a clear ruler to do that directly on the fabric as you'll see in this pic:

The space between the red edge of the pattern and the blue line measures 1 cm, I just follow the pattern all along with this ruler and trace.
Also, I've discovered that the V-band is one continuous piece from back to front, you should join the 2 drafted parts at the shoulder before tracing on the fabric:

I've decided to lengthen the bodice and the sleeves a little by the way, +4 cm and +7cm.
I'm glad you're having fun tracing, I told you it's not difficult^^ I've planned to make mine in black & white, we'll see how it works! See you!
dimanche 6 juin 2010
Sew-along 3
Hey there, it's D-day^^! I have pics of the drafted pattern to show you, you'll see that I use paper tablecloth to draw :) And to answer your questions, seam allowances are NOT included. I've washed my fabrics and I can't wait to start tracing, see you!


samedi 5 juin 2010
Sew-along 2
Hello everyone, hope your weekend is starting well! As you know tomorrow we begin drawing the pattern for the Nani Iro Japanese top. Some of you may not be familiar with this kind of stuff so I've numbered the steps in the order I usually draw my patterns, I've found it goes more smoothly this way :) Just trace your lines from 1 to 18 and everything should be fine (repeat the same order for the back piece)! See you!


mercredi 2 juin 2010
Sew-along 1
Hello! Just a quick post about the notions needed for the top:
 FABRIC: 41" x 2.7 YARDS
OPTIONAL: ONE 1" BUTTON
Depending on the fabric you use you may need some interfacing for the V band at the neckline.
I like to finish hems with bias tape so you may want to buy/prepare some if you want to do this too.
All the measures are given in centimeters.
Hope it helps, see you!
EDIT: I got asked about the grain for the V-band and you just have to follow the arrow so for this part it's the shoulder line that is on the straight grain :)
Inscription à :
Articles (Atom)


